A reverse proxy allows you to send events to PostHog Cloud using your own domain.
This means that events are sent from your own domain and are less likely to be intercepted by tracking blockers. You be able to capture more usage data without having to self-host PostHog.
Setting up a reverse proxy means setting up a service to redirect requests from a subdomain you choose (like e.yourdomain.com) to PostHog. It is best practice to use a subdomain that does not include posthog, analytics, tracking, or other similar words.
You then use this subdomain as your instance host in the initialization of PostHog instead of app.posthog.com or eu.posthog.com.
Note: PostHog Cloud requires that the proxy sets the
Hostheader toeu.posthog.comfor requests sent tohttps://eu.posthog.comandapp.posthog.comfor requests sent tohttps://app.posthog.com.
Deploying a reverse proxy
Using Caddy
We like using Caddy because it makes setting up the reverse proxy and TLS a breeze.
You'll want to sub out YOUR_TRACKING_DOMAIN for whatever domain you use for proxying to PostHog. We'd suggest something like e.yourdomain.com or the like.
Make sure your DNS records point to your machine and that ports 80 and 443 are open to the public and directed toward Caddy.
Using AWS CloudFront
CloudFront can be used as a reverse proxy. Although there are multiple other options if you're using AWS
CloudFront doesn't forward headers, cookies, or query parameters received from the origin that PostHog uses by default. To set these up, you need an "origin request policy" as in the instructions below.
Create a distribution
- Create a CloudFront distribution
- Set the origin domain to your PostHog instance (
app.posthog.comoreu.posthog.comfor PostHog Cloud). - Allow all HTTP methods
- Create and attach to the distribution, an "origin request policy" that forwards all query parameters
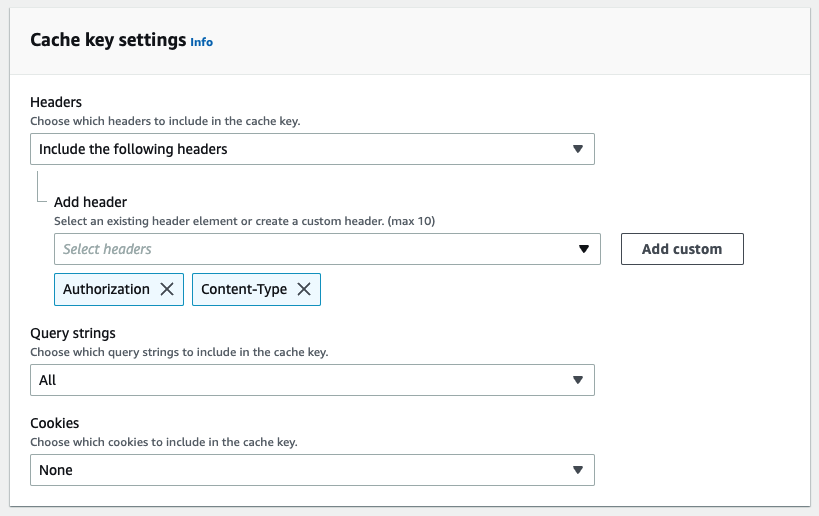
- In "Cache key settings" for the "Cache policy" set "Query strings" to "All".
- You may also need to set any headers your application needs as part of the cache key. For example the
AuthorizationorContent-Typeheaders.
- Choose the appropriate price class for your use
- Once the distribution is deployed set its URL as the API host in your JS snippet or SDK config
- Create a lambda@edge to set the Host header (example).
You can view AWS CDK code for creating a reverse proxy here (originally shared by CJ Enright in our Slack community, 100 🦔 points for them 💖!).
You can find out about CloudFront pricing on the AWS website
CloudFront distribution setup video
Using Cloudflare
In Cloudflare, create a new CNAME record for your domain. It should point to app.posthog.com or eu.posthog.com depending on your region, and have proxy enabled (e.g. CNAME, e, app.posthog.com, proxy enabled). Finally, use Page Rules to change the Host header.
Cloudflare does require your domain to be hosted with them, and using them does more than just proxying requests, such as blocking traffic from bots. Additionally, you must be on the Enterprise CloudFlare plan to customize the Host header.