This app enables you to export events to Amazon S3 on ingestion. Archive your data, or simply free it up for other kinds of analysis, by integrating export right into your event processing pipeline.
Note: Currently, this plugin does not support exporting of historical data and will only export data that is ingested while the app is enabled. We're actively looking into adding support for historical exports.
Install
PostHog Cloud
PostHog Cloud users can find the app here on the apps page.
Before you can enable the app, you will need to configure it by clicking on the settings icon. Once the app has been configured, you can enable it by flipping the toggle and it will start exporting newly ingested events to S3.
PostHog Self-hosted
The S3 Export Plugin requires a PostHog instance running version 1.24.0 or later. Not running 1.24.0? Find out how to update your self-hosted PostHog deployment!
- Log in to your PostHog instance
- Click 'Apps' on the left-hand navigation
- Search for 'S3'
- Select the 'S3 Export Plugin' and press 'Install'
- Configure the app by entering your AWS credentials and S3 bucket details
- Enable the app and Watch events roll into S3!
Configure
Before we can get things set up in PostHog, we will need to work on creating an S3 Bucket in AWS which we will use as a destination for our events.
Already have a bucket set up? Skip here to start configuring access to your bucket.
Creating a bucket

Make sure to take note of both the name of your bucket and the region that it's in, we'll need these later.
Set up access
Next, we'll need to create a new user in our AWS console with programmatic access to our newly created bucket.
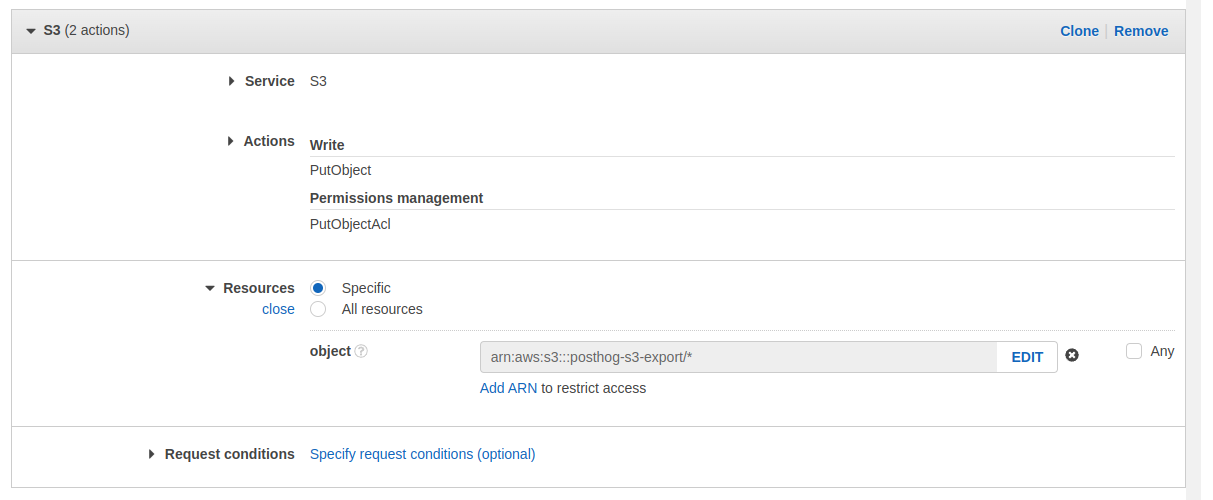
- Open IAM and create a new policy to allow access to this bucket.
- On the left under "Access management" select "Policies" and click "Create policy"
- Under the service, choose "S3"
- Under "Actions" select
- "Write" -> "PutObject"
- "Permission Management" -> "PutObjectAcl"
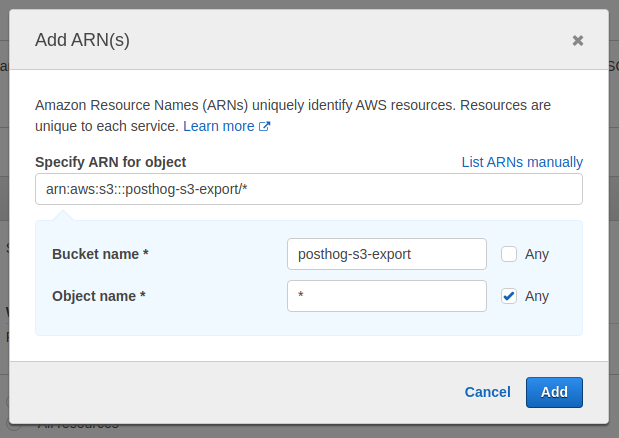
- Under "Resources" select "Specific" and click "object" -> "Add ARN"
- Specify your bucket name and choose "any" for the object name. In the example below, replace
posthog-s3-exportwith the bucket name you chose in the previous section
- Your config should now look like the following
- Click "Next" until you end up on the "Review Policy" page
- Give your policy a name and click "Create policy"
The final step is now to create a new user and give them access to our Bucket by attaching our newly created Policy.
- Open IAM and navigate to "Users" on the left
- Click "Add Users"
- Specify a name and make sure to choose "Access key - Programmatic access"
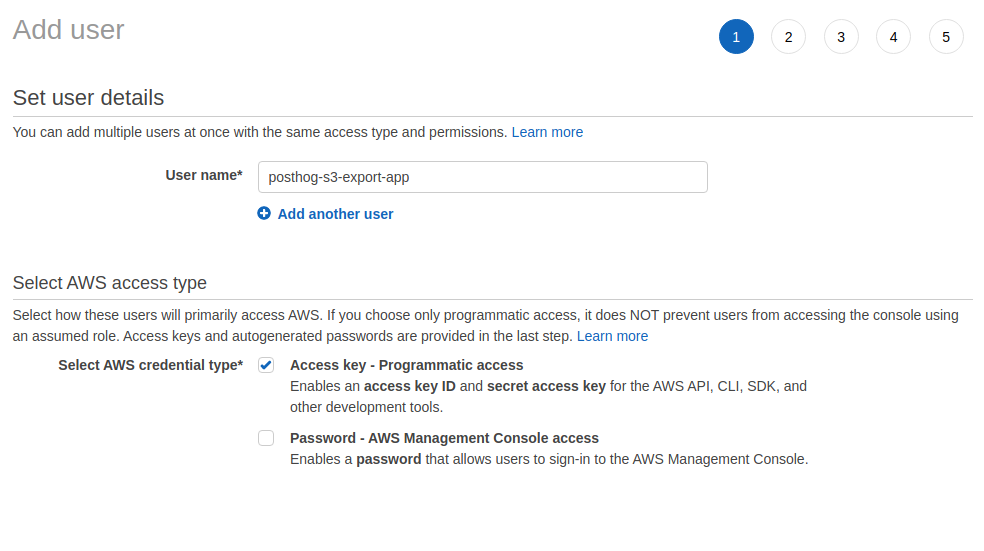
- Click "Next"
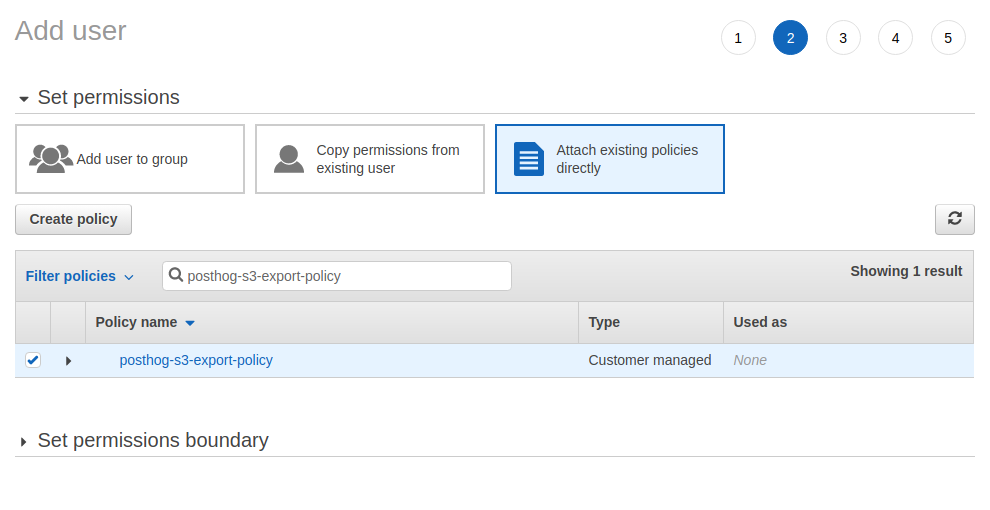
- At the top, select "Attach existing policies directly"
- Search for the policy you just created and click the checkbox on the far left to attach it to this user
- Click "Next" until you reach the "Create user" button. Click that as well.
- Make sure to copy your "Access key" and "Secret access key". The latter will not be shown again.

Configure the app
Now that we have our Bucket set up, we have all the information we need to set up the S3 Export app!
- Start by navigating back to your PostHog dashboard and opening the "Apps" page.
- Open the configuration for the S3 Export plugin by clicking the settings icon.
- First, we'll fill in the information for our S3 Bucket
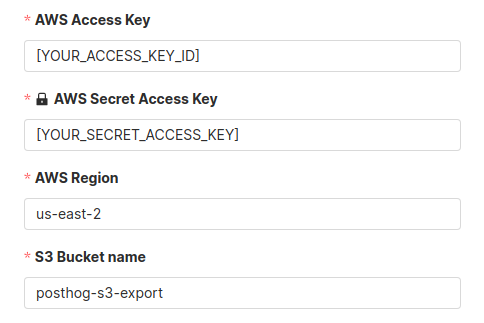
Note: Make sure to replace the
S3 Bucket nameandAWS Regionwith the values for your own bucket!
Finally, we'll configure the rest of the settings. Below is a list of a few important options, with a more detailed list of all available options in the next section.
S3 filename prefix- This option is used if you need to prefix filenames with a specific identifier, or if you want to store exports in a specific directory within your Bucket. The latter option can be done using a prefix which ends in a trailing slash (e.g. /posthog/exports)
Upload at most every X minutes- Default: Every minute
- This option sets how frequently the app will check for new events. This plugin buffers events in-memory before uploading them, and this timeout determines how frequently it will check this buffer for new events.
Maximum upload size- Default: 1 MB
- Each time an upload is ingested into PostHog, this plugin will check whether its internal buffer is under this limit. If at any point it exceeds this limit, it will immediately flush events to S3. As a result, this plugin may upload more frequently than specified in the
Upload at most every X minutessettings if the buffer frequently reaches this limit.
Batch uploads
To vastly increase export throughput, this app batches events in memory before uploading them to S3. Upload frequency (every minute by default) and maximum upload size (1 MB by default) can be configured when the app is installed.
You should make sure to keep these numbers reasonable to avoid running out of memory on your server. Note that the values apply to each concurrent app server thread.
Configuration
Basic Options
| Option | Description |
|---|---|
AWS Access KeyType: String Required: Yes | The Access Key ID for the User you created in AWS. |
AWS Access Secret KeyType: String Required: Yes | The secret Access Key for the User you created in AWS. |
AWS RegionType: String Required: Yes | The AWS region where you created the destination bucket. |
S3 Bucket nameType: String Required: Yes | The name of the bucket where you would like to send exports. |
S3 filename prefixType: String Required: No | This will be prepended to every file sent to S3. Allows you to specify a directory to store exports in (backups/posthog/ with a trailing slash). |
Upload at most every X minutesType: Number Required: Yes | This option sets the interval at which the plugin will check if there are new events to export. The value must be between 1 and 60 (minutes). |
Maximum upload size (megabytes)Type: Number Required: Yes | The maximum single file size that this plugin will send to S3. When the buffer reaches this limit, the app will automatically send these events to S3. The value must be between 1 and 100 MB. |
Events to ignoreType: String Required: No | Comma separated list of events to ignore |
Format of uploaded filesOptions: jsonlDefault: jsonl | Currently, we only support exports in jsonl, which serializes events in JSON, one event per line. |
CompressionOptions: gzip, brotli, noneDefault: gzip | The method used to compress events before sending. Upload size limits are applied before compression. |
Advanced Options
| Option | Description |
|---|---|
S3 Bucket endpointType: String Required: No | Used when exporting to S3-compatible storage other than AWS. For example: http://127.0.0.1:9000, which is a minio or localstack instance that is API compatible with Amazon S3 |
Signature versionOptions: V4 | AWS Signature version used when signing uploads. |
Server-side encryptionOptions: disabled, AES256, aws:kmsDefault: AES256 | Specifies server-side encryption of the object in S3. |
SSE KMS key IDType: String Required: No | The customer-managed AWS Key Management Service (KMS) key ID that should be used to server-side encrypt the object in S3. Only used if the Server-side encryption option is set to aws:kms |
Further information
Who created this app?
A lot of people worked on this app! We'd like to thank the following contributors for creating the S3 Export app. Thank you, all!
What if my question isn't answered above?
We love answering questions. Ask us anything via our Support page or using the Q&A widget at the bottom of the page.
You can also join the PostHog Community Slack group to collaborate with others and get advice on developing your own PostHog apps.